HOWTO Lesson 4 :
Creating .RES's
(NOTE : This lesson
assumes that you've already read and understood Lesson 1,2, and 3)
Copyrightę 2001-2002 by Kevin Wilson
This page outlines the steps to take to create a Resource File (".RES") and include it within your main project. It also explains how you can create and utilize DLL's dedicated to just holding your resource files called "Resource DLL's".
A Resource File is a repository where you can store images, sounds, videos, data, or whatever you like. You can stored any file type in a resource file. It's like your project's suitcase... stuff can be put there and kept there, and retrieved easily when needed (NOTE: Resource files are Read-Only). When you compile your project, the resource file is compiled right into the .EXE, .DLL, .OCX, etc., which makes accessing what's in the resource file easier, but makes the size of the compiled file as large as the orignal compiled file, plus the size of all of the contents of the resource file. As a note, if you put a BITMAP or any other compressable file into a resource file, it will NOT be compressed when the project is compiled. Therefore, it's a good idea to store files in a resource file as a compressed format where possible to save space. So instead of using BITMAPS, use JPEG or PNG where possible.
Now images, sounds, videos, and data can be stored as individual files externally to your project, but doing so means you have to clutter up the user's hard drives with multiple support files. Then there's the possibility that the support files will get lost, renamed, deleted, corrupted, etc. If they are compiled into project, you know they aren't corrupted because if the project's corrupted, it won't run and you've got bigger problems than your support files being corrupted or missing.
As a note, you can use a resource file right within your project (and Visual Basic's native resource functions are designed for this), but it is also possible to create a "resource only DLL". This is where your support files and multimedia files are compiled into a seperate DLL so your main project's compiled file dosn't get HUGE due to the fact that you use a 2 MB AVI file or something. That way, it's easy to update or patch the main project file without having to update the support / multimedia files every time too. I'll explain how to create a "resource only DLL" later in this lesson.
The best reasons for using a resource file are:
1) Consolidation - Putting your support / multimedia files into a resource file makes it so that you don't have to clutter the user's hard drive with a bunch of extra files
2) Orginization - Putting your images into a resource file (instead of embedding them onto a Form in your project for example) makes them easy to find and makes them easy to orginize and retrieve. This applies to other file types as well.
3) Security - If you put data files into a resource file, they get compiled and can't be retrieved externally (unless you decompile the binary/executable file into Assembly and go through it... which very few know how to do, let alone care to do). Or if you have images that you want to use, but don't want others to gain access to... putting them into your project in a resource file gives you access to them but at the same time hides them from everyone else.
4) Speed - It is much easier and faster to load an image, a sound, or other type of file from a resource within your project than it is to load them from file. The reason is that when you load a compiled file like an .EXE or .DLL... the entire thing (including any resources contained within) is loaded into RAM. So retrieving a file stored in a resource within that .EXE, .DLL, etc. is a simple matter of grabbing a pointer to it in RAM (which is what happens behind the scenes). If you were to load the same resource from file, you'd have the overhead of locating the file on the hard drive, reading the file, loading it into memory, then using it (along with any error checking).
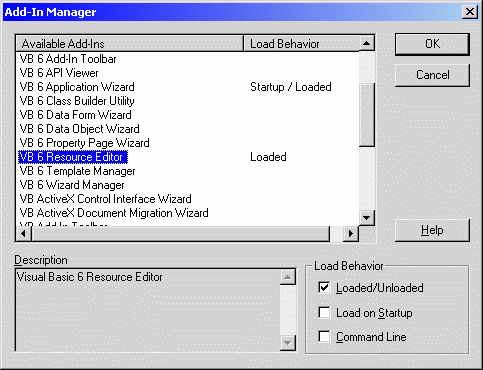
The first thing you have to do is open your project that you want to add a resource to. Then, you have to load the "Resource Editor" Add-In. To do this, go to Visual Basic's "Add-Ins" menu and select "Add-In Manager". In Visual Basic 6, select "VB 6 Resource Editor" and check the box that says "Loaded/Unloaded":

Make sure that you don't check "Load on
Startup" because there's a bug with the Resource Editor
where when VB starts up and the Resource Editor is set to start automatically, it will put
the following image into your clipboard (overwriting any existing contents of your
clipboard): ![]()
In Visual Basic 5.0, the Add-In Manager looks like this:
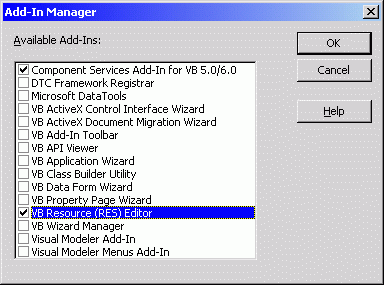
Again, make sure that you uncheck the "Resource Editor" from the Add-In Manager after you're done with it for the same reason as above.
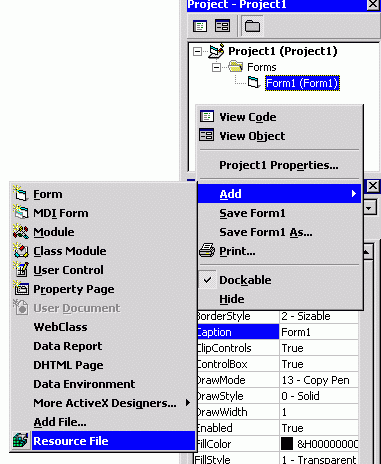
Now that you've done that, add a resouce (.RES) file to your project by right-clicking on VB's "Project Window" and selecting "Resource File" from the "Add" pop-up menu:
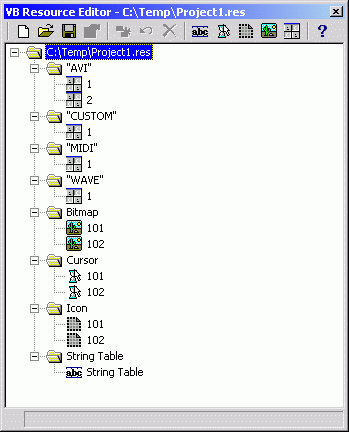
Once you've done this, it will ask you what .RES file to open. If you have an existing .RES file you wish to add, find it and select it. Otherwise, type in the name of the NEW resource file to create. It will ask you if you want to create the .RES file... say "YES". Now you'll notice that your newly created .RES file exists in your project window under "Related Documents". If you double click on it, it will bring up the actual editor window where you can add "String Tables", "Cursors", "Icons", "Bitmaps", or "Custom Resources":
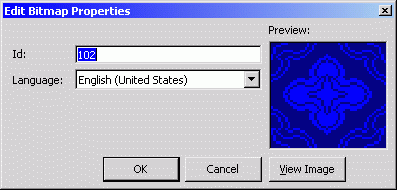
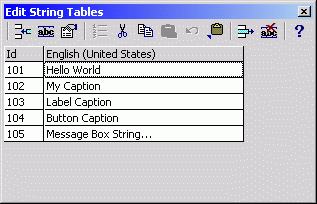
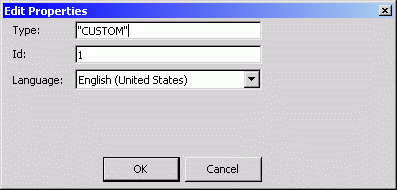
Double-clicking on any of the items you have added will bring up that item's properties window where you can change it's name, it's index, and preview what it looks like (if it's an image):
Edit dialog for images:
Edit dialog for string tables:
Edit dialog for custom resources:
USING RESOURCES LOCATED IN YOUR PROJECT:
Now that you've added all of your files to the resource that you need, renamed them how you like, and modified the ID's to what you would like them to be... you're ready to open up Visual Basic and start making use of your resources.
First, to load images from a resource file, you use the "LoadResPicture" function... specifying the Bitmap, Icon, or Cursor as the image type and ID like this:
| Dim objBitmap As StdPicture Dim objIcon As StdPicture Dim objCursor As StdPicture Set objBitmap = LoadResPicture(101, vbResBitmap) Set objIcon = LoadResPicture(101, vbResIcon) Set objCursor = LoadResPicture(101, vbResCursor) Me.AutoRedraw = True Set Me.Picture = objBitmap Set Me.Icon = objIcon Set Me.MouseIcon = objCursor Me.MousePointer = vbCustom Set objBitmap = Nothing Set objIcon = Nothing Set objCursor = Nothing |
Second, to load a string from a String Table, you use the "LoadResString" function... specifying the ID of the string to load like this:
| Dim strReturn As String strReturn = LoadResString(101) Me.Caption = strReturn |
Third, to load "Custom Resources" (like .WAV, .MID, and .AVI files), you use the "LoadResData" funciton... specifying the name of the custom resource and the ID of the resource to load like this:
| Dim FileNum As Integer Dim DataArray() As Byte DataArray = LoadResData(1, "WAVE") FileNum = FreeFile Open "C:\TEMP\TEMP.WAV" For Binary As #FileNum Put #FileNum, 1, DataArray() Close #FileNum Erase DataArray |
If you have many different types of custom resources, it's a good idea to put them under a descriptive resource name. For example, specify "WAVE" as the custom resource name for all of your .WAV files, and "MIDI" for all of your .MID files, etc.
In the last example, the custom resource is saved out to a temporary file... you can also use the file while in memory like this:
| Option Explicit Private Const SND_APPLICATION = &H80 |
USING RESOURCES LOCATED IN AN EXTERNAL DLL FILE:
To this point, we've been talking about using resources that are located within your project and are compiled into the same binary file. However, it can be advantageous sometimes to create a seperate Resource DLL file to hold all of your support files and multimedia files. To do this, you first need to create a DLL which contains a resource file. Using the information discussed in "HOWTO Lesson 2 : Creating .DLL's", start an ActiveX DLL project and rename the default "Class1" class module to "NoInterface" (or something like that) to indicate that this ActiveX DLL isn't meant to be instantiated and called as a COM object, but rather meant to be a static source of resources. Next, open up the resource editor and add your Bitmaps, Icons, Cursors, String Tables, and/or custom resources and save the resource as part of the ActiveX DLL project. Now that you have your DLL setup, your resources loaded into it, and the DLL's project properties set as you wish... go ahead and compile it. Remember, you don't need to add ANYTHING to the "NoInterface" class. It's only there to satisfy the VB requirement of having at least one public class interface to the DLL. Also, keep in mind that you do NOT have to register resource DLL's using "REGSVR32.EXE" like you do with other ActiveX DLL's. However, VB automatically registers the DLL when you compile it, so you can unregister it at this point if you like using "REGSVR32.EXE" with the "/U" parameter.
Now open up another project (perhaps a standard .EXE project) and use the "LoadLibrary" API to open the DLL you've created. After you've successfully opened the resource DLL you created, use the "LoadBitmap", "LoadIcon", "LoadCursor", "LoadString", and "FindResource" / "LoadResource" / "LockResource" / "SizeofResource" API's to retrieve the resource information you need from the DLL. After you've retrieved all the information you need from our resource DLL, close it and clean it up by calling the "FreeLibrary" API.
Your code should look something like this:
| Option Explicit Private Type BITMAP bmType As Long 'LONG bmWidth As Long 'LONG bmHeight As Long 'LONG bmWidthBytes As Long 'LONG bmPlanes As Integer 'WORD bmBitsPixel As Integer 'WORD bmBits As Long 'LPVOID End Type Private Const WM_SETICON = &H80 Private Const ICON_BIG = 1 Private Const SND_APPLICATION = &H80 Private Const SND_ALIAS = &H10000 Private Const SND_ALIAS_ID = &H110000 Private Const SND_ASYNC = &H1 Private Const SND_FILENAME = &H20000 Private Const SND_LOOP = &H8 Private Const SND_MEMORY = &H4 Private Const SND_NODEFAULT = &H2 Private Const SND_NOSTOP = &H10 Private Const SND_NOWAIT = &H2000 Private Const SND_PURGE = &H40 Private Const SND_RESOURCE = &H40004 Private Const SND_SYNC = &H0 Private Declare Function FindResource Lib "KERNEL32" Alias "FindResourceA" (ByVal hLib As Long, _ ByVal strName As String, ByVal strType As String) As Long Private Declare Function FreeLibrary Lib "KERNEL32" (ByVal hLib As Long) As Long 'BOOL Private Declare Function LoadLibrary Lib "KERNEL32" Alias "LoadLibraryA" ( _ ByVal strFilePath As String) As Long Private Declare Function LoadBitmap Lib "USER32" Alias "LoadBitmapA" (ByVal hInstance As Long, _ ByVal lngBitmapID As Long) As Long Private Declare Function LoadCursor Lib "USER32" Alias "LoadCursorA" (ByVal hLib As Long, _ ByVal lngCursorID As Long) As Long Private Declare Function LoadIcon Lib "USER32" Alias "LoadIconA" (ByVal hLib As Long, _ ByVal lngIconID As Long) As Long Private Declare Function LoadString Lib "USER32" Alias "LoadStringA" (ByVal hLib As Long, _ ByVal ResourceID As Long, ByVal lpBuffer As String, ByVal nBufferSize As Long) As Long Private Declare Function LoadResource Lib "KERNEL32" (ByVal hLib As Long, _ ByVal hRes As Long) As Long Private Declare Function LockResource Lib "KERNEL32" (ByVal hRes As Long) As Long Private Declare Function SizeofResource Lib "KERNEL32" (ByVal hModule As Long, _ ByVal hResInfo As Long) As Long Private Declare Function PlaySound Lib "WINMM.DLL" Alias "PlaySoundA" (ByRef Sound As Any, _ ByVal hLib As Long, ByVal lngFlag As Long) As Long 'BOOL Private Declare Function SendMessage Lib "USER32.DLL" Alias "SendMessageA" (ByVal hWnd As Long, _ ByVal wMsg As Long, ByVal wParam As Long, ByRef lParam As Any) As Long Private Declare Function SetCursor Lib "USER32.DLL" (ByVal hCursor As Long) As Long Private Declare Function BitBlt Lib "GDI32" (ByVal hDC_Destination As Long, _ ByVal X_Dest As Long, ByVal Y_Dest As Long, ByVal Width_Dest As Long, _ ByVal Height_Dest As Long, ByVal hDC_Source As Long, ByVal X_Src As Long, _ ByVal Y_Src As Long, ByVal RasterOperation As Long) As Long Private Declare Function DeleteDC Lib "GDI32" (ByVal hDC As Long) As Long Private Declare Function CreateCompatibleDC Lib "GDI32" (ByVal hDC As Long) As Long Private Declare Function GetDC Lib "USER32" (ByVal hWnd As Long) As Long Private Declare Function SelectObject Lib "GDI32" (ByVal hDC As Long, ByVal hGDIObj As Long) As Long Private Declare Function DeleteObject Lib "GDI32" (ByVal hGDIObj As Long) As Long Private Declare Function GetObjectAPI Lib "GDI32" Alias "GetObjectA" (ByVal hObject As Long, _ ByVal nCount As Long, lpObject As Any) As Long Private Declare Function ReleaseDC Lib "USER32" (ByVal hWnd As Long, ByVal hDC As Long) As Long Private Sub Form_Load() Const FILE_NAME As String = "Project1.dll" Dim strFilePath As String Dim hLibrary As Long Dim hResource As Long Dim hData As Long Dim lpData As Long Dim hIcon As Long Dim hCursor As Long Dim hBitmap As Long Dim strString As String Dim lngStringLen As Long Dim BitmapInfo As BITMAP Dim hDC_Screen As Long Dim hDC_Temp As Long Dim hBMP_Prev As Long Me.Show Me.AutoRedraw = True ' Get the path to the Resource DLL strFilePath = App.Path If Right(strFilePath, 1) <> "\" Then strFilePath = strFilePath & "\" strFilePath = strFilePath & FILE_NAME ' Load the Resource DLL hLibrary = LoadLibrary(strFilePath & Chr(0)) If hLibrary = 0 Then MsgBox "Failed to load the specified library with error code " & Err.LastDllError Exit Sub End If ' Get an icon from the Resource DLL hIcon = LoadIcon(hLibrary, 101) If hIcon <> 0 Then SendMessage Me.hWnd, WM_SETICON, ICON_BIG, ByVal hIcon ' Get a cursor from the Resource DLL hCursor = LoadCursor(hLibrary, 101) If hCursor <> 0 Then SetCursor hCursor ' Get a string from the Resource DLL strString = String(256, Chr(0)) lngStringLen = LoadString(hLibrary, 101, strString, Len(strString)) If lngStringLen <> 0 Then Me.Caption = Left(strString, lngStringLen) ' Get a bitmap from the Resource DLL hBitmap = LoadBitmap(hLibrary, 101) If hBitmap <> 0 Then GetObjectAPI hBitmap, Len(BitmapInfo), BitmapInfo hDC_Screen = GetDC(0) hDC_Temp = CreateCompatibleDC(hDC_Screen) hBMP_Prev = SelectObject(hDC_Temp, hBitmap) BitBlt Me.hDC, 0, 0, BitmapInfo.bmWidth, BitmapInfo.bmHeight, hDC_Temp, 0, 0, vbSrcCopy Me.Refresh SelectObject hDC_Temp, hBMP_Prev DeleteDC hDC_Temp ReleaseDC 0, hDC_Screen End If ' Get a .WAV file from the Resource DLL hResource = FindResource(hLibrary, "#" & CStr(1) & Chr(0), "WAVE" & Chr(0)) If hResource <> 0 Then hData = LoadResource(hLibrary, hResource) 'This gets a handle to the data If hData <> 0 Then lpData = LockResource(hData) 'This gets a POINTER to the data... which is what we need If lpData <> 0 Then PlaySound ByVal lpData, 0, SND_MEMORY Or SND_NODEFAULT Or SND_SYNC End If End If End If ' Close the Resource DLL FreeLibrary hLibrary End Sub |
So did you find yourself freaking out after looking at all that API code? Not to worry! I've taken all the code here to make use of resource files both within and without your project and wrapped it all up into one easy-to-use class module called "cResource.cls" which you can download from this site. Now all you have to do is worry about is what you'll put in your resource files and how you'll use them! =)
ENJOY!
MAIN | DOWNLOADS | SAMPLE CODE | STEP BY STEP | DISCUSSION BOARD | LINKS | AUTHOR
E-MAIL
![]()