
HOWTO Lesson 1 : Creating .EXE's
Copyrightę 2001-2002 by Kevin Wilson
This page outlines the steps to take to create a "standard executable" or "stand-alone executable" program and explains the concepts behind each step.
The purpose of stand-alone programs is to provide the program's functionality on the user's machine without the aid of any other program such as a web browser or a "virtual machine". The following are the most common forms of EXEs:
- Background Running
- Command Line Driven
- GUI
Background Running:
Background Running programs are programs that are designed to start up and perform some task in the background... never bothering the user with an interface, or only show an interface if the user specifies to see one. Even though these programs are running in the background and requires no interface to the user, it is good programming to provide some way of setting options for your program, or closing the program if the user so desires. The most common way of doing this is to put an icon in the "System Tray" next to the clock like this:

This way, the user knows that your program is running and can interact with your program by clicking or right-clicking on the icon in the System Tray. In the above picture, you can tell that ICQ, AOL Instant Messenger, MSN Messenger, Sound Volume, Microsoft Intellipoint, and another program are all running in the background. For the messenger programs, you don't want them open and bugging you unless you get a message, or unless you want to send one. You don't want to mess with an interface for the sound volume unless you need to adjust the system's sound volume. You don't need to mess with the Intellipoint Mouse settings unless you want to change the operation of your mouse. These programs all run in the background and their design makes sense.
You can get an ActiveX control that lets you put icons in the system tray easily by going to the "ActiveX Controls" section of this web page and downloading and installing "SysTray_OCX.zip". Or you can go to the "Class Modules" section of this web page and download and use the "cSysTray.cls" class module to programmatically put an icon in the system tray.
Command Line Driven:
Command Line Driven programs are programs that are most commonly executed from an MS-DOS Prompt or from another program. These types of programs most often (but not always) have no interface at all and are meant to do something, then shut down. The program is told what to do by passing it "command line parameters" which is a set of codes that the program recognizes as commands to do something. These command line parameters are passed as if they were part of the path to the program like this:
C:\PKZIP.EXE ZipPic.zip MyPic.bmp
In the above line, the program PKZIP.EXE is executed and two parameters are passed to the program. The ZIP file to create, and the file(s) to put in the ZIP file (in that order). In this case, ZipPic.zip is the file that will be created from the file MyPic.bmp. The program starts up, reads in the command line parameter(s), interprets them, then takes action based on them.
There are a lot of GUI programs that take advantage of command line parameters as well as added functionality. For example, if you run the following at a command prompt or a the START -> RUN dialog, NOTEPAD will start up and automatically load the file "TEST.TXT":
C:\WINDOWS\NOTEPAD.EXE C:\TEST.TXT
The program NOTEPAD.EXE, which is located in the Windows directory, is executed and the string "C:/TEST.TXT" is passed to it. NOTEPAD takes this string and interprets it to be a path to a text file, which it then opens and displays for the user to read or manipulate in some way.
In Visual Basic, using command line parameters is very easy... they are passed in using the function "Command". Here is some sample code on how to read in and use a set of command line parameters:
| Dim NoGrad As Boolean Dim NoSplash As Boolean ' Check if the /NoGrad command line parameter was passed If InStr(UCase(Command), "/NOGRAD") > 0 Then NoGrad = True End If ' Check if the /NoSplash command line parameter was passed If InStr(UCase(Command), "/NOSPLASH") > 0 Then NoSplash = True End If |
To pass a command line parameter to your program in DEBUG mode, go to the "Project" menu and select the "Project Properties" option. This will bring up a screen that looks like this:
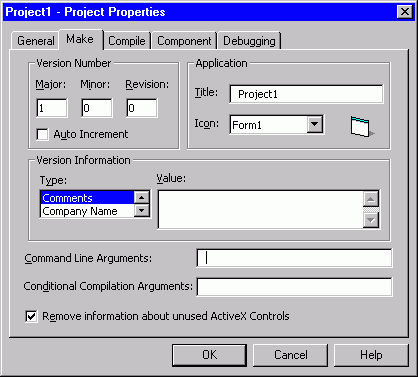
Click on the "Make" tab to bring you to the displayed screen, and in the "Command Line Arguments" text box, enter your command line... like "/NoGrad" and then click OK. Now press the F8 key to start your program and step into the start of your code... and then keep pressing the F8 key to step through each of the lines of code so you can see how VB uses the "Command" function.
GUI:
The most common interface to .EXE programs is what is called a "GUI"... which stands for "Graphical User Interface". GUI programs consist of some kind of visible way for the user to communicate to the program. Here is a screen shot of the program CALC.EXE (Calculator):
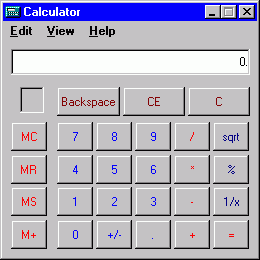
The GUI for this program is fairly straight forward... you have buttons which you push to enter numbers and you have buttons which you push to do mathematical calculations with the numbers entered. There is also an area where you can see the result of your button pushing. You also have the ability to use your keyboard and type the "9" key instead of pushing the "9" button. You'll also notice that there is a "menu system" available to you comprised of the "Edit", "View", and "Help" menu items. Each one of these when clicked on (or activated by the <ALT>+E, <ALT>+V, or <ALT>+H keystroke... as indicated by the underlined letters) brings down a menu that you can use to make the program do certain things. You'll also notice that you can move this window out of the way by clicking on the first of the three buttons in the upper-right corner (minimize button), or you can close the program by clicking on the third of the three buttons in the upper-right corner (close button).
All of these elements make up the GUI and serve their own purpose. Your task as a programmer is to make all these pieces work together in a way that makes sense, looks cohesive, and looks both organized and attractive to the user. Imagine if the GUI you just saw looked like this instead:
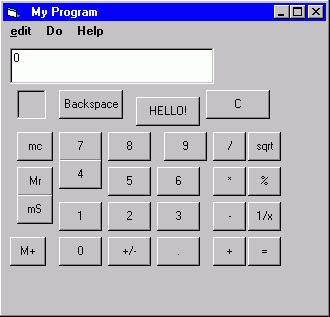
This GUI offers all the functionality of the first version... but the presentation is non-cohesive, unorganized, and is anything but attractive to the user! The capitalization of the items on the interface is inconsistent, the alignment and size of the items on the interface are sporadic, the title of the program is not descriptive, no effort was made to change the icon from the default icon to one that makes more sense for this program, the menu item "Do" and the button "HELLO!" don't make sense in this application, only one of the menu items has a hot-key designated by the underscore, and no effort was made to color coordinate the buttons to make their functionality more clear. These things do not take very long to do CORRECTLY and they make a HUGE difference in the presentation of your program.
Now that we've discussed the different types of programs, lets get into the details of how to actually program a GUI style program.
First start up Microsoft Visual Basic 5 or 6. These two versions of Visual Basic (VB) are largely the same program with a few differences that will not be made apparent in this HOWTO lesson. If you do not have a copy of VB, Click Here to find out how you can get a free copy of VB 5.0 CCE.
When VB starts up, you'll notice that it shows the following dialog box by default... which prompts you to pick what type of program you're going to be writing (this is a screen shot from Visual Basic 6.0 - Enterprise Edition [SP4]... your screen may differ slightly in appearance):
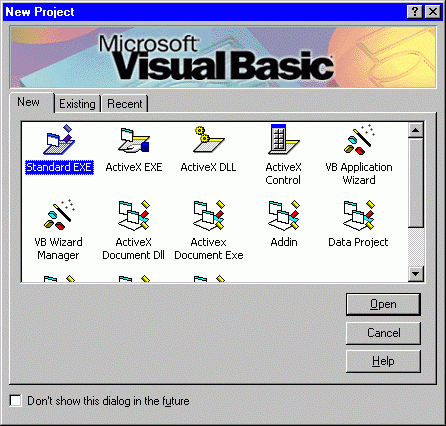
In this HOWTO lesson, I'll be showing you how to create the most common type of program... a GUI "Standard EXE" or "Stand-Alone EXE"... so select the first one and click "Open". When you do this, VB creates a default project with a default "Form" to start you out with. The programming interface in VB (also known as the Integrated Development Environment, or "IDE") looks like this:
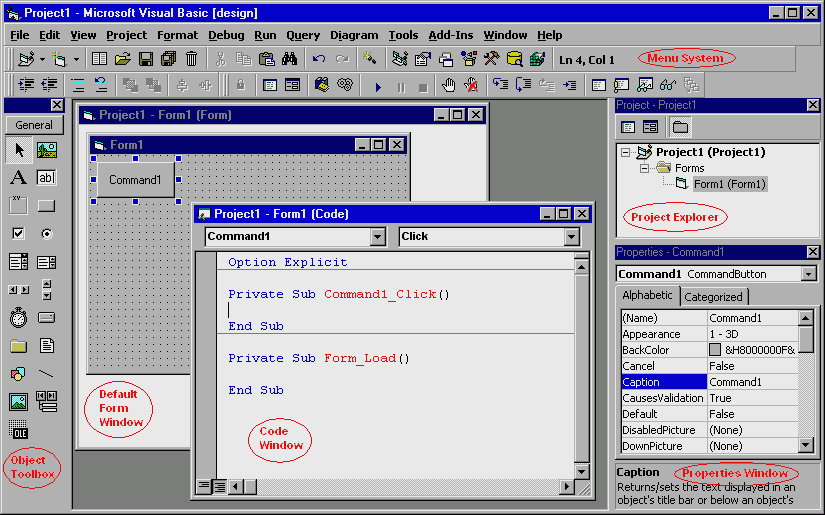
You'll notice that things are divided into windows within the IDE... the Object Toolbox, the Project Explorer, the Properties Window, the Form Design Window, the Code Window, and the Menu System. Each has an important purpose described as follows:
Object Toolbox:
The Object Toolbox is what you use to place objects on your form... or the window that you're designing to be the interface for your program. When I say "objects", I mean Buttons, Text Boxes, Check Boxes, Drop-Down Lists, Picture Boxes, etc. These are the things... or objects... that make up the interface to your program (aside from the actual form or window that holds all the objects. How you place objects and change their properties... or the attributes about the objects that makes them look and act how you want them to... is what makes up your interface.
You'll notice that there is a Button (referred to in VB as a CommandButton) already placed on the form. To place other objects on the form, simply double click them in the Toolbox, or click them once to select them... then go to the form and "draw" them onto the form by clicking and holding the left mouse button, then moving it to the size you desire.
The following two interfaces are exactly the same as far as their functionality is concerned... but because a little more time and effort when into the design of the second one, it is more attractive to the user:
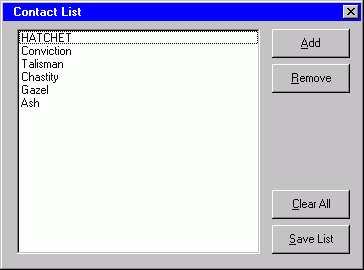
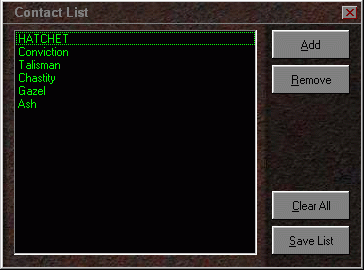
Here are the differences between the first form and the second:
Only 12 things were changed on the form... and they were all done within the VB IDE... NO CODING WAS DONE... and look at the difference it makes on the interface! It really is worth it to take the extra time and make your interface worth looking at... a lot of programmers simply do not take the time they should on the interface. Though you have a powerful program to present... users will not give it a chance if the interface is confusing, frustrating, overly complex, or boring.
You will learn through practice what objects do what in the Toolbox... but for the most part, they are all pretty self-explanatory. TextBox's display text and allow the user to edit it... Label controls display text without the user being able to edit it, CommandButtons provide an easy way to do things at the push of a button, PictureBox controls display pictures, etc.
Default Form Window:
The default form window is the window that contains your form that your working with to build an interface as described above. Pretty straight-forward stuff.
The Code Window:
The code window is where you make the interface do things. For example... if you want the button shown in the VB IDE screen shot above to do something, you would double click on the button... which will bring you into the code window to a sub routine that is called when the user clicks on the button. You can type in some code there to show the button was pushed like:
| Private Sub Command1_Click() MsgBox "Hello World!", vbOKOnly + vbInformation, "It Worked!" End Sub |
The code above will display a Message Box that says "Hello World!", has just an OK button, displays an "Information" icon, and has a caption that says "It Worked!".
You'll notice a few things here:
- The first being that when you type in "MsgBox" and then hit the space bar, VB knows that "MsgBox" is a pre-defined function that calls for additional information to be passed to that function... and it shows you what is expected in the form of some text that appears below your cursor. This additional information is passed in the form of what's called "parameters". You'll notice that they are separated by commas ( , ). This is something that I LOVE about VB because I don't have to constantly be checking to see if I passed parameters in the right order, or if I'm passing the right kind of parameters... the text that appears tells me all of this information without me even asking for it or looking for it. If you write your own functions or sub routines that call for parameters, you'll notice VB does the same thing for custom routines as it does for native ones that are built into VB... like the "MsgBox" or "InputBox" functions.
- The second thing you'll notice is that there are a couple of drop down lists... or ComboBox's above the code window... the first says "Command1" and the other says "Click". The first one contains a list of all the objects available to you from that form. If you click the pull-down arrow, you'll see the complete list of objects. The second list is a list of "Events" or actions associated with that object or control. The default is "Click", but you can also put code behind the "MouseDown" or "MouseUp" events... which are called when the user presses a mouse button down and/or up while the cursor is over that control. To put code behind the MouseDown event, simple click the pull-down arrow of the second ComboBox and select the MouseDown event. The following code automatically appears for you to start you out:
| Private Sub Command1_MouseDown(Button As Integer, Shift As Integer, X As
Single, Y As Single) End Sub |
Properties Window:
The Properties Window shows all the available properties for whatever object is currently selected. If no objects or controls are selected, no properties are displayed in this window. If you select the CommandButton that has been placed on the form, as is shown in the VB IDE screen shot, you'll see that the default properties are as follows:
Name = "Command1"
Appearance = 1 (3D)
BackColor = &H8000000F
Cancel = False
Caption = "Command1"
etc...
If you change these properties in the property window, they are instantly updated for the object they represent. For instance... if you change the caption from "Command1" to "Hello", you'll notice the text on the CommandButton changes to "Hello". These properties that you're setting through the VB IDE are being changed at "Design Time"... meaning you're in design mode when you're doing these things. All of these properties can be changed at "Run Time"... or when the program is running... as well by calling that object's properties in code like this:
Command1.Appearance = 1
(3D)
Command1.BackColor
= &H8000000F
Command1.Cancel
= False
Command1.Caption
= "Command1"
etc...
You'll notice that the only difference between setting the properties at "Design Time" and setting them at "Run Time" is you put the name of the object first, add a period ( . ), and then specify the property you want to change along with the new value. You'll notice here that some properties are "Read Only" at Run Time... meaning you can't change them while the program is running. The "Name" property is one of these because that is what uniquely identifies that object and changing it would mess up all your code that you wrote for that object at Design Time. You'll also notice that when you type the name of the object in Design Time, and then type a period ( . ) that a drop-down list of properties and functions (when a function or sub routine is associated with an object, it's called a "method") is shown to you so that you can just scroll down to the right property and select it. This is a really nice feature because you don't mistype the name of the property or method you wish to call.
Project Explorer:
The "Project Explorer" window is where you can keep track of, and easily navigate to the different components that make up your project. You can add components to the project by right-clicking on the Project Explorer window and going to the "Add" menu item to select the type of component to add... or you can go to the "Project" menu and add the component you wish from there. These components can be one of the following:
| Form | Standard "window" that holds other objects like CommandButtons, etc. | |
| MDI Form | Multiple Document Interface Form... which holds other forms... similar to how MS Word 97can have several documents open inside the same application | |
| Module | A public repository for code that can be used throughout the program... or project | |
| Class Module | A type of object that
does not have an interface and allows you to easily modify it's properties and methods
within your project (see the Sample Code section for examples of class modules and
how they are used) Class Modules are the main components of ActiveX DLL's and will be covered in more detail in the HOWTO lesson "Creating .DLL's" |
|
| User Control | A type of object that
DOES have an interface and allows you to customize at Design Time the behavior and
appearance you desire it to have at Run Time. This type of component can be used
just like a Label or CommandButton in your project. When added, it appears in your
Toolbox and you can add it to a Form, etc. User Controls are the main components of ActiveX controls and serve as the interface to the control. This will be covered in more detail in the HOWTO lesson "Creating .OCX's" |
|
| Property Page | When you right click
on certain objects (like the Microsoft Common Dialog Control) in the VB IDE at Design Time
and select "Properties" from the pop-up menu that appears over that object
you'll see a customized properties dialog appear that allows you to change the object's
properties in a more complex way than is available through the "Properties
Window" Property Pages are an important components of ActiveX Controls and will be covered in more detail in the HOWTO lesson "Creating .OCX's" |
|
| User Document | A special type of ActiveX control meant for internet/intranet use within Microsoft Internet Explorer (Netscape does not support ActiveX objects or scripting) | |
| Resource File | A special type of
storage file that can be used to store pictures, sounds, icons, files, etc. Resource Files are a very powerful tool and their use will be covered in more detail in the HOWTO lesson "Creating .RES's" |
|
| Other File | You also have the ability to add "Other Files" to your project if you like. This option is commonly used to add a ReadMe.txt file to the project for other details about the project aimed at developers that will be looking at the project's code in the future |
Menu System:
The menu system is where you control everything about the Visual Basic Integrated Development Environment (VB IDE). This is a tool that you can easily customize to your liking as well. Simply right click anywhere on the menus or toolbars and select "Customize":
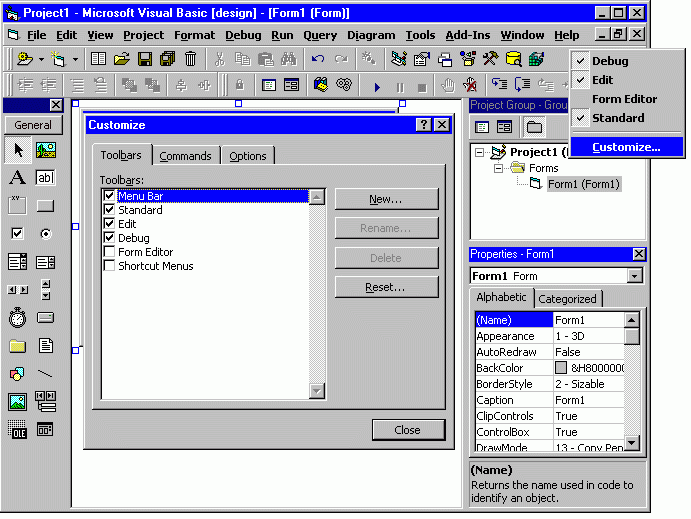
When the "Customize" dialog appears, you'll notice that there are three tabs... "Toolbars", "Commands", and "Options". Under the Toolbars tab, you can select which toolbars you wish to be visible. Under the Commands tab you can "drag and drop" the different menu items to the toolbars or menus as you please... making it possible to completely customize how the toolbars and menus look. Under the Options tab you can set such options as showing the hotkeys for the different toolbar items in the ToolTipText as you move your cursor over them.
You'll notice that in the screen shots of my VB IDE... the menus and toolbars are setup slightly different than the default settings when you first install VB. That is because I like the VB IDE setup this way because it makes the options and commands that I most often use readily available to me while I'm programming. Over time, you'll find the options and commands that you most often use and you can then customize your toolbars and menus to make those things readily available to you to speed up your work in VB.
PUTTING CODE BEHIND YOUR PROGRAM:
Putting the code behind the interface of your program is the "hard part" of the whole thing... it's what makes a dead interface come to life with the functionality you desire for it. Learning how to CORRECTLY write Visual Basic code is an art really and takes time and practice to perfect. Anyone can throw down syntax that makes VB do something... but it takes a skilled professional to write code that is clear, concise, efficient, well structured, well documented, and easy to read.
You can buy any number of books on VB programming available from such places as Desaware.com (under the Books section), Amazon.com (Books > Subjects > Computers & Internet > Programming > Languages & Tools > Visual Basic), or Barnes & Noble (www.bn.com - Bookstore > Computer > Programming > VB).
You can also visit any number of sites dedicated to teaching you how to program using Visual Basic... like this one. For your convenience, I have linked to several other VB sites which I have visited and valued as good VB sites. You can go to my "VB Links" section to view the list of sites I have linked to.
You can also look at other people's code to see how they did what they did in VB and learn by example. I have compiled a good amount of sample code which you can freely use within your projects or look at to learn from example. Visit my "Sample Code" section for more details.
You can also take classes on programming concepts and/or programming with Visual Basic either from local colleges, or local certified training centers. This route is a little more expensive, and a little more time consuming than say reading a book... but you gain the advantage of having an experienced programmer there to answer your questions, customize lessons to your needs, and show you by example first hand what to do. Look around for certified training centers, or colleges offering such classes in your area.
I myself have found that I learn best from being in an interactive classroom, reading books, and looking at other people's code... but find that I do most my learning from looking at other people's code. I recommend taking a look at all the avenues available to you and deciding which one is best for you... then taking that route to learn how to correctly code in VB. In the mean time, I would offer the following "10 Commandments of Programming" as a guideline to your programming:
| 1)
"Option Explicit" is the first line in your code 2) As little dependencies as is possible (none if you can help it) 3) Keep the code clean and orderly 4) Always include error checking where prudent, or needful 5) Don't forget code documentation / commenting 6) Keep code properly indented and aligned 7) Always spell out ByRef / ByVal for subroutine parameters or declarations 8) Always explicitly spell out the data types of dimensioned variables 9) Include sample usage coded in subroutine documentation where applicable 10) Take the time to give your project a "user friendly" look and feel |
Once you have designed your interface, and have put code behind it to make it look and act the way you like... it's time to compile it into an .EXE file. Most programmers do not take the time to correctly do this and the difference is noticeable.
The first thing you do is go to the "File" menu and select "Make <NAME>.exe" where <NAME> is whatever name you have assigned to your project. This pops up the following dialog:
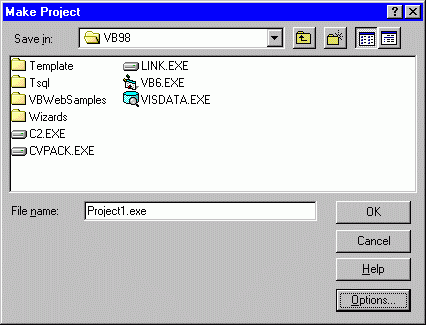
You'll notice that this dialog is asking you where to put the newly created .EXE file and what to call it. Most people just name the .EXE file and hit the "OK" button to compile. A very important step is being left out here. Before clicking the OK button, click the "Options" button to bring up the following dialog:
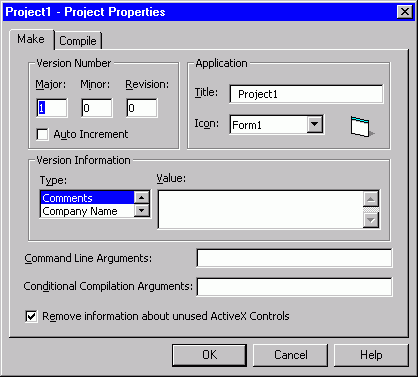
In this dialog there are two tabs... the "Make" tab, and the "Compile" tab. Unless you are a very advanced programmer and are creating your program for a specific need... do not mess around with any of the settings under the Compile tab. 99% of the time the default settings under this tab work just great.
Under the "Make" tab, there are a number of things that should be done:
1) Make sure that you set the version number for your program to reflect the progression of the program. If you start out with a program that is version 1.0 (the default) and then you make a major modification to the program that is not visible in the interface, and do not change the version number... there will be no way for you or anyone else to tell if your users have the most up to date version without doing something like checking the byte size of the .EXE file (which can fluctuate up or down... or not change at all). If you want VB to automatically increment the "Revision" number for you every time you compile your program, check the "Auto Increment" option.
You can also check the version number of your program from within your code at Run Time like this:
| Dim MajorVer As Integer Dim MinorVer As Integer Dim RevsnVer As Integer MajorVer = App.Major MinorVer = App.Minor RevsnVer = App.Revision Debug.Print "Version = " & MajorVer & "." & MinorVer & "." & RevsnVer |
2) Make sure you give your program a descriptive title and icon in the "Title" and "Icon" fields. These show up in the Windows Task List when the user runs your program and then presses <CTRL> + <ALT> + <DEL>. You'll notice that you have to select an icon to represent your program from an existing Form in your project. If you do not have any forms in your project or want a different icon for your program than is present on any of your forms, you can create a "dummy" form for the sole purpose of holding your program's icon. You then can set the "Icon" property of that dummy form and select it in that drop-down list in this dialog for your program's icon.
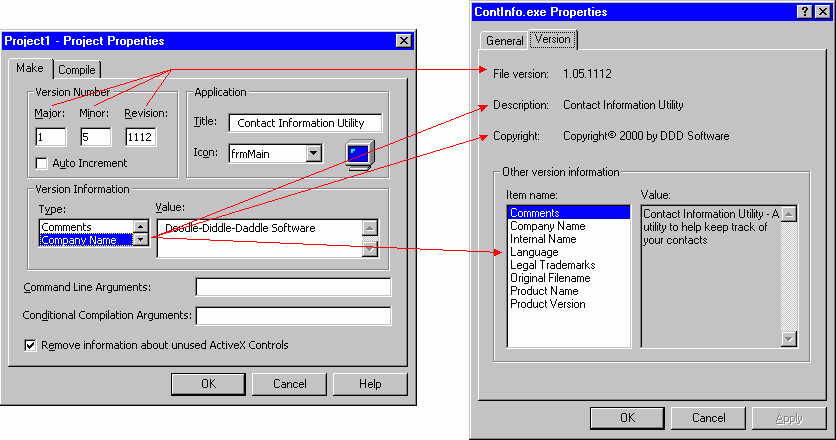
3) Make sure that you set the proper information for the "Version Information" section. Setting these fields makes it so that the user can go into Windows Explorer and right click on your .EXE file and go to the "Properties" tab to see more descriptive information about the program... like this:
After you have finished filling out all the needed information under the "Make" tab, click the OK button to save the changes and then click "OK" again to start compiling your program. You'll find that as VB is compiling your program, it is checking it for errors and if it finds any, it will take you to the place in your code that is causing the error and tell you what is going wrong there. That gives you the opportunity to fix it and recompile. I will often compile my program half-way through the development process just to check for errors.
Once you've finished this... you're all done!! You now have a compiled stand-alone application that does whatever you programmed it to do.
MAIN | DOWNLOADS | SAMPLE CODE | STEP BY STEP | DISCUSSION BOARD | LINKS | AUTHOR
E-MAIL
![]()